
How to Build a Package
This guide walks you through building a contextual ad package from start to finish. This walks a user through each step in the process from confirming your Dynamic Tags via VLA (Video Level Aggregation), to configuring targeting logic for a package, and finally exporting a bundle to your ad server.
Step 1: Validate Your Tags in VLA
Context Studio reads from your existing tag library in VLA. Tags must be in Validated status before they’ll appear in Context Studio and here’s how to get them there.
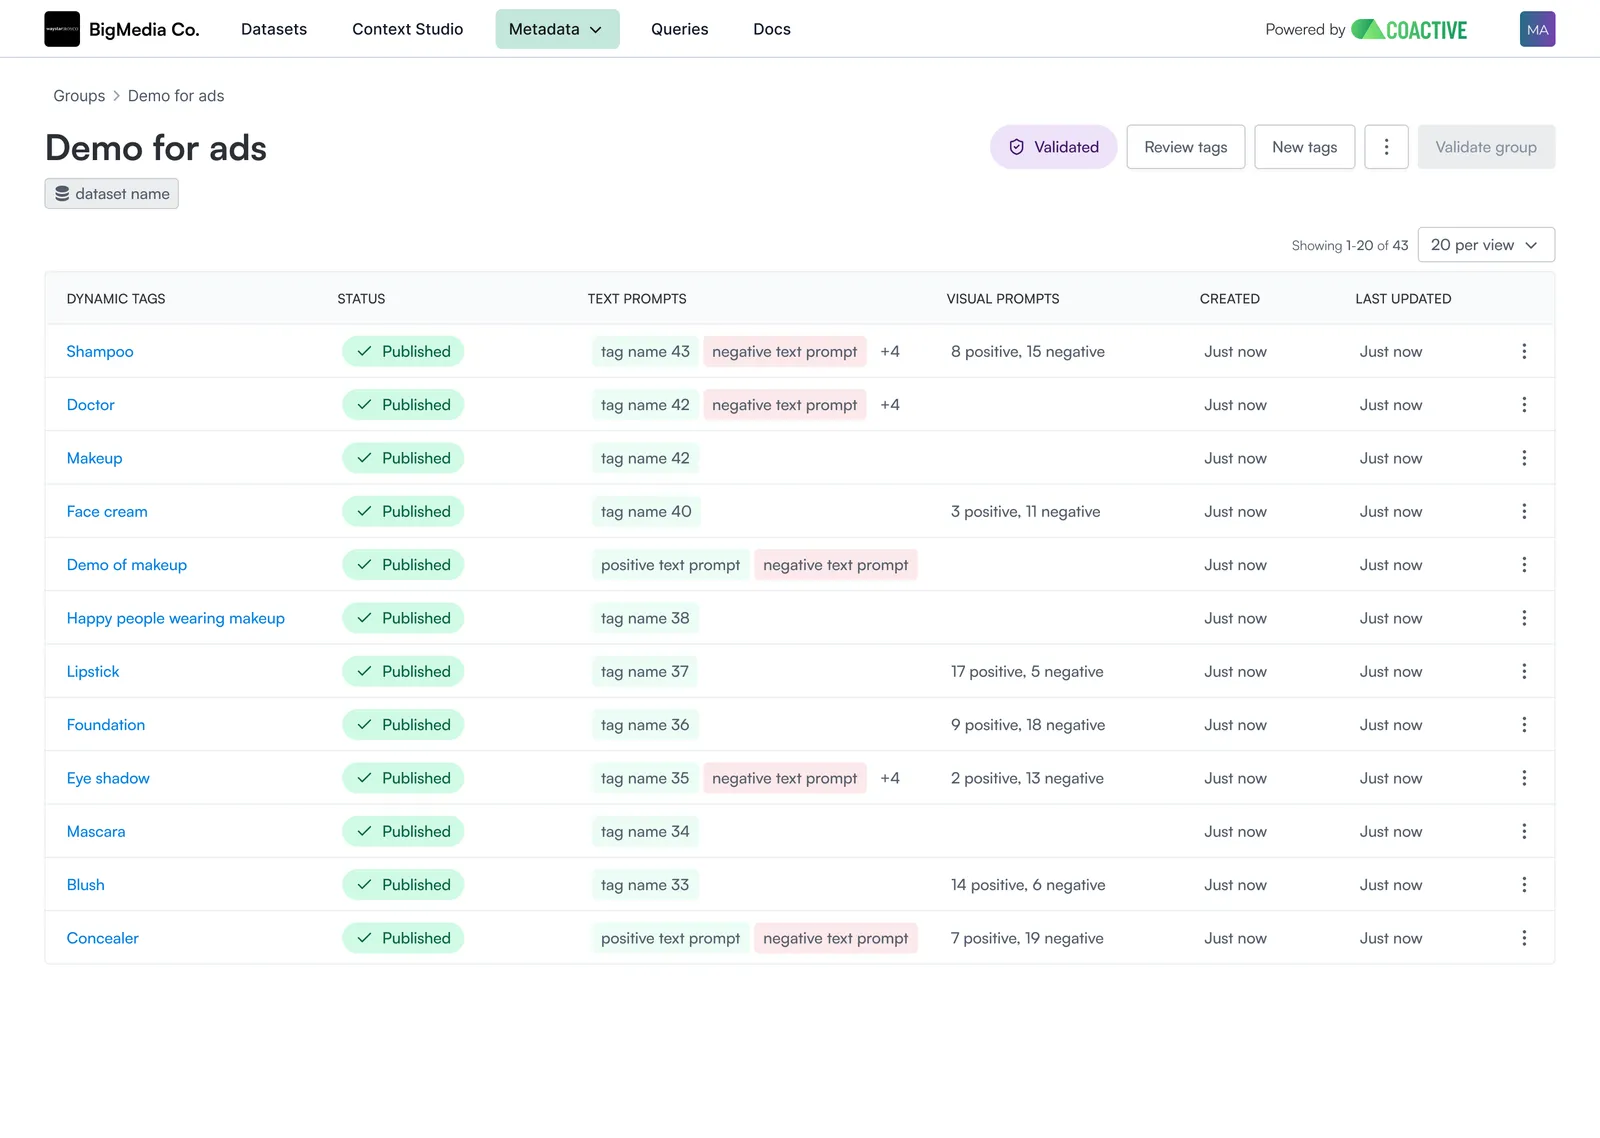
- Open the Dynamic Tags page
- Select the tag group you want to use
- Click Review Tags in the top right corner of the group
- This opens the VLA (Video Level Aggregation) view, where you can review aggregation methodologies and videos for each tag
Before this step, the tag group must be in Published status. See the Dynamic Tags guide for details on publishing.
- After visually confirming the tags look accurate, mark the group as validated. It will show a purple Validated badge on the Dynamic Tags dashboard and within the group page
- Repeat for all tag groups you plan to use as inclusion or exclusion criteria for Context Studio
Once your tags are validated, return to Context Studio to build the package.
Step 2: Create a New Package
- From the Coactive workspace, open Context Studio
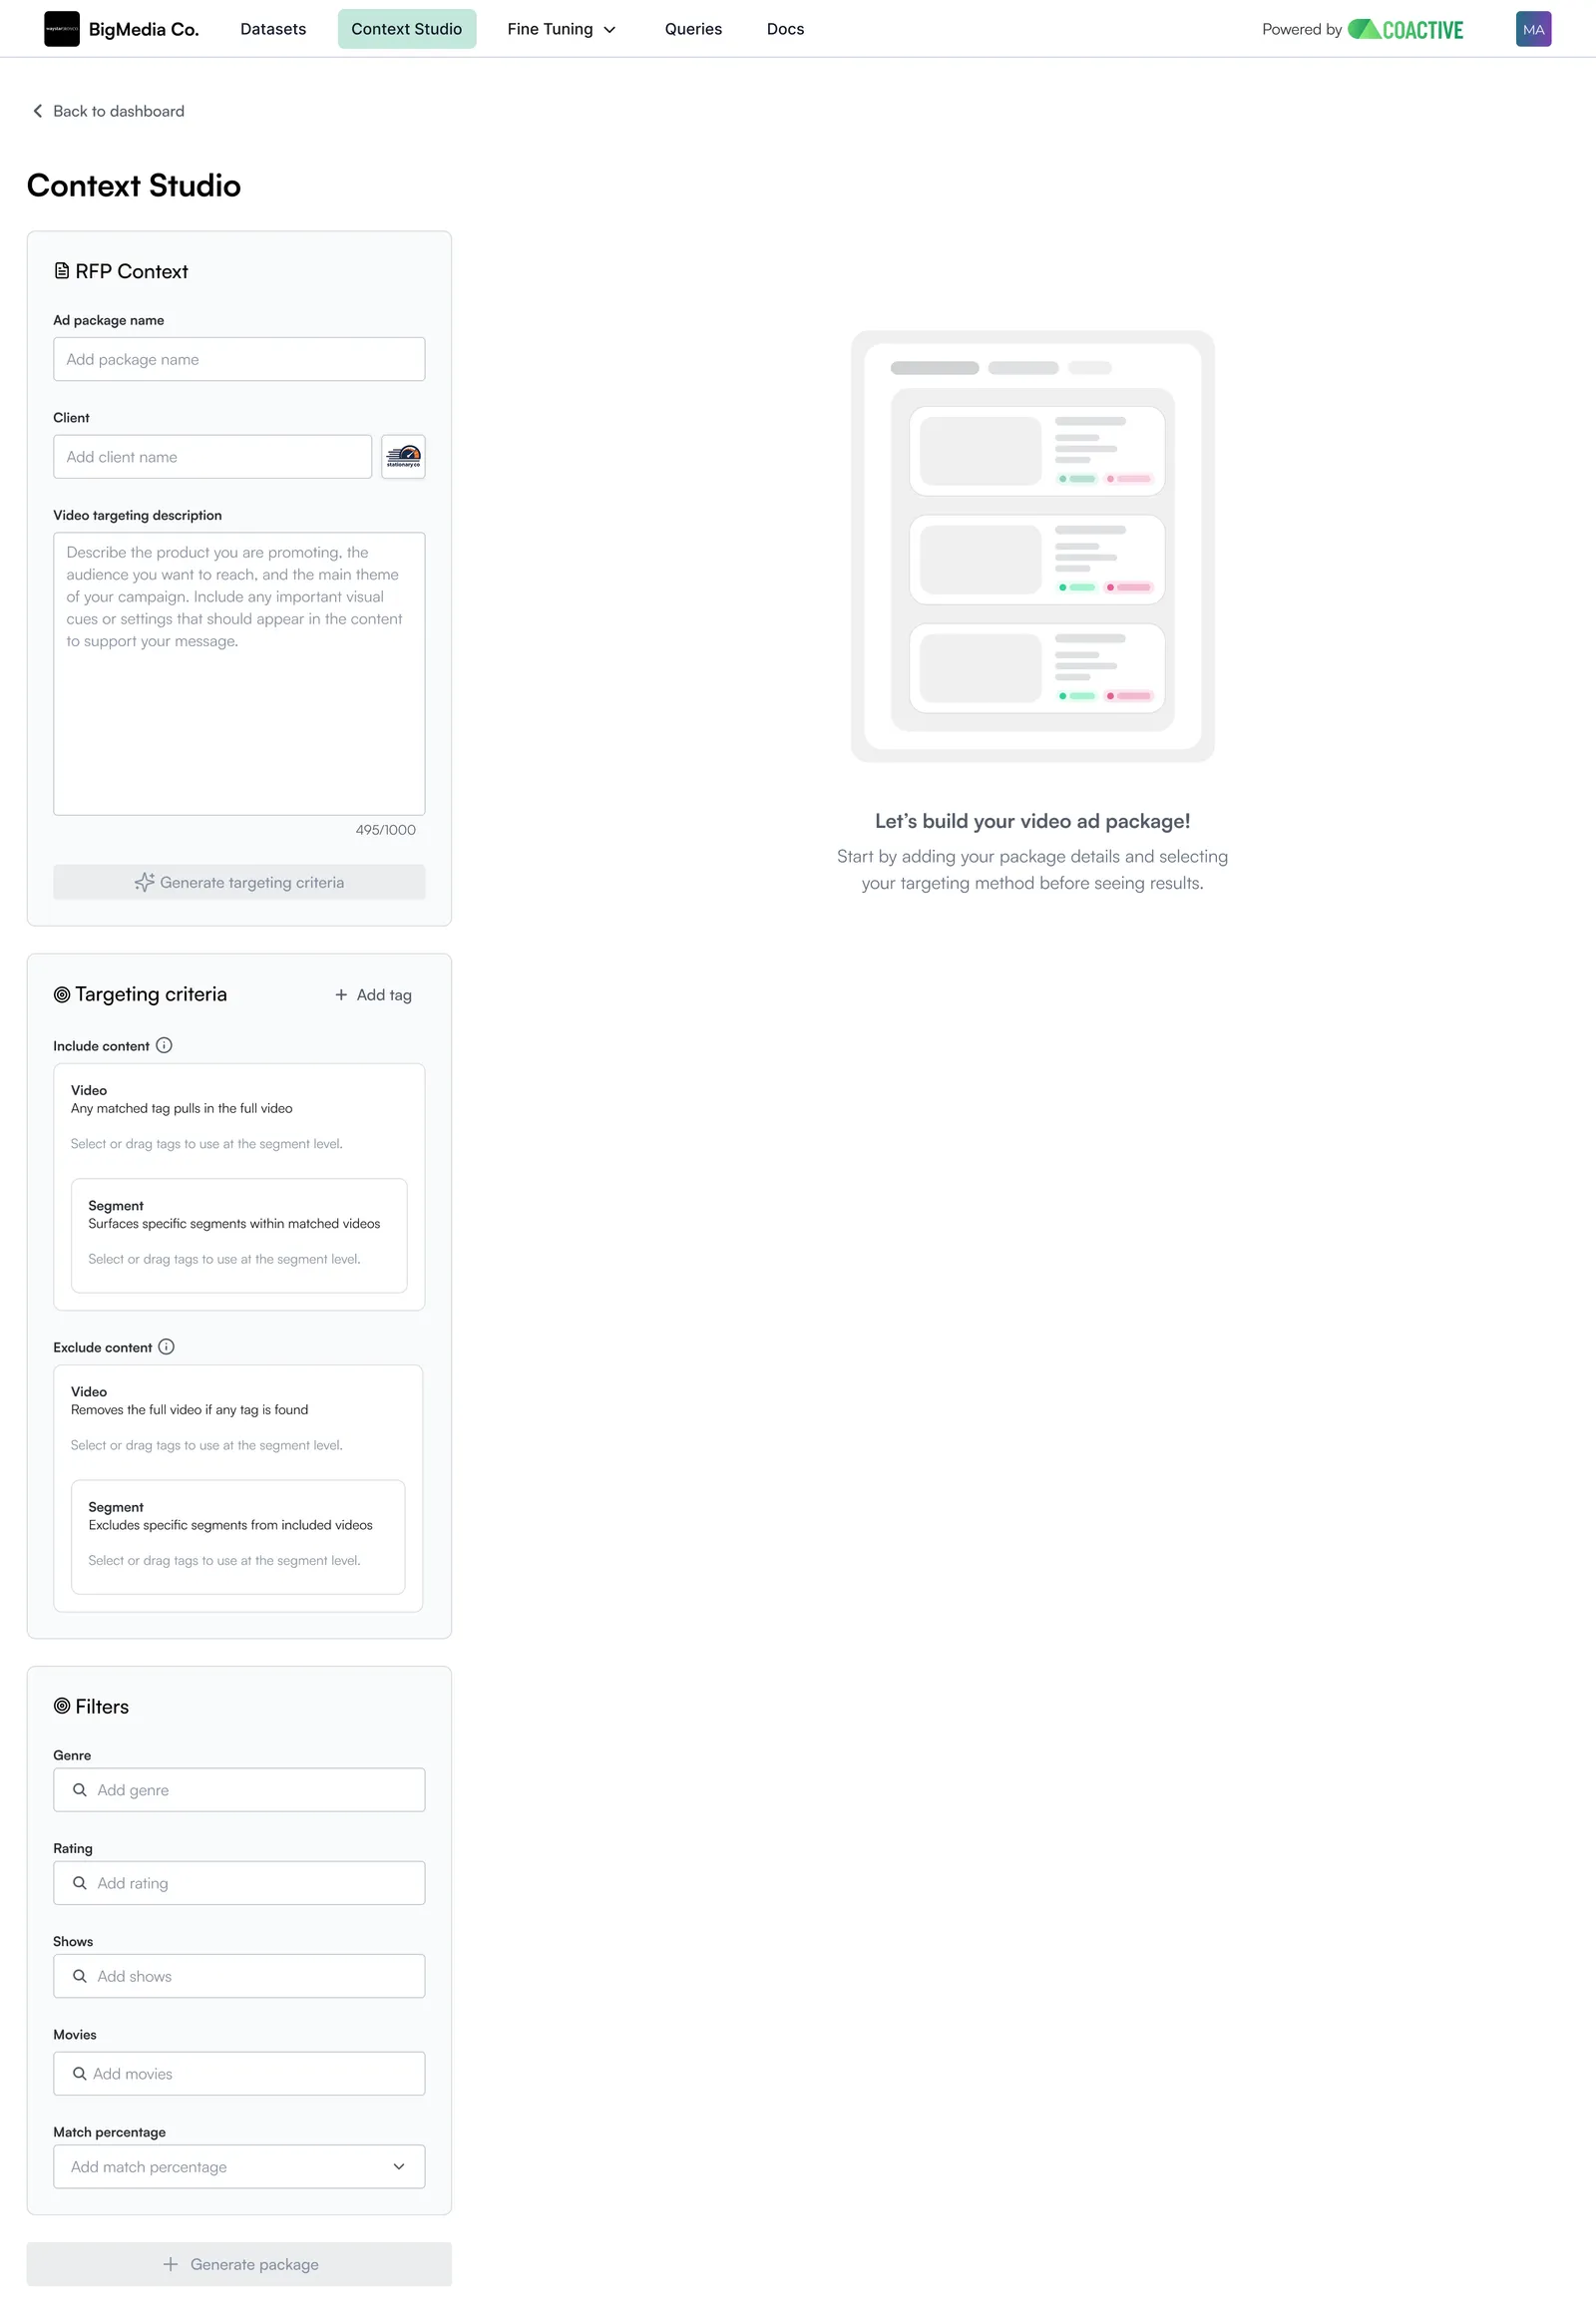
- Click New Package (top right)
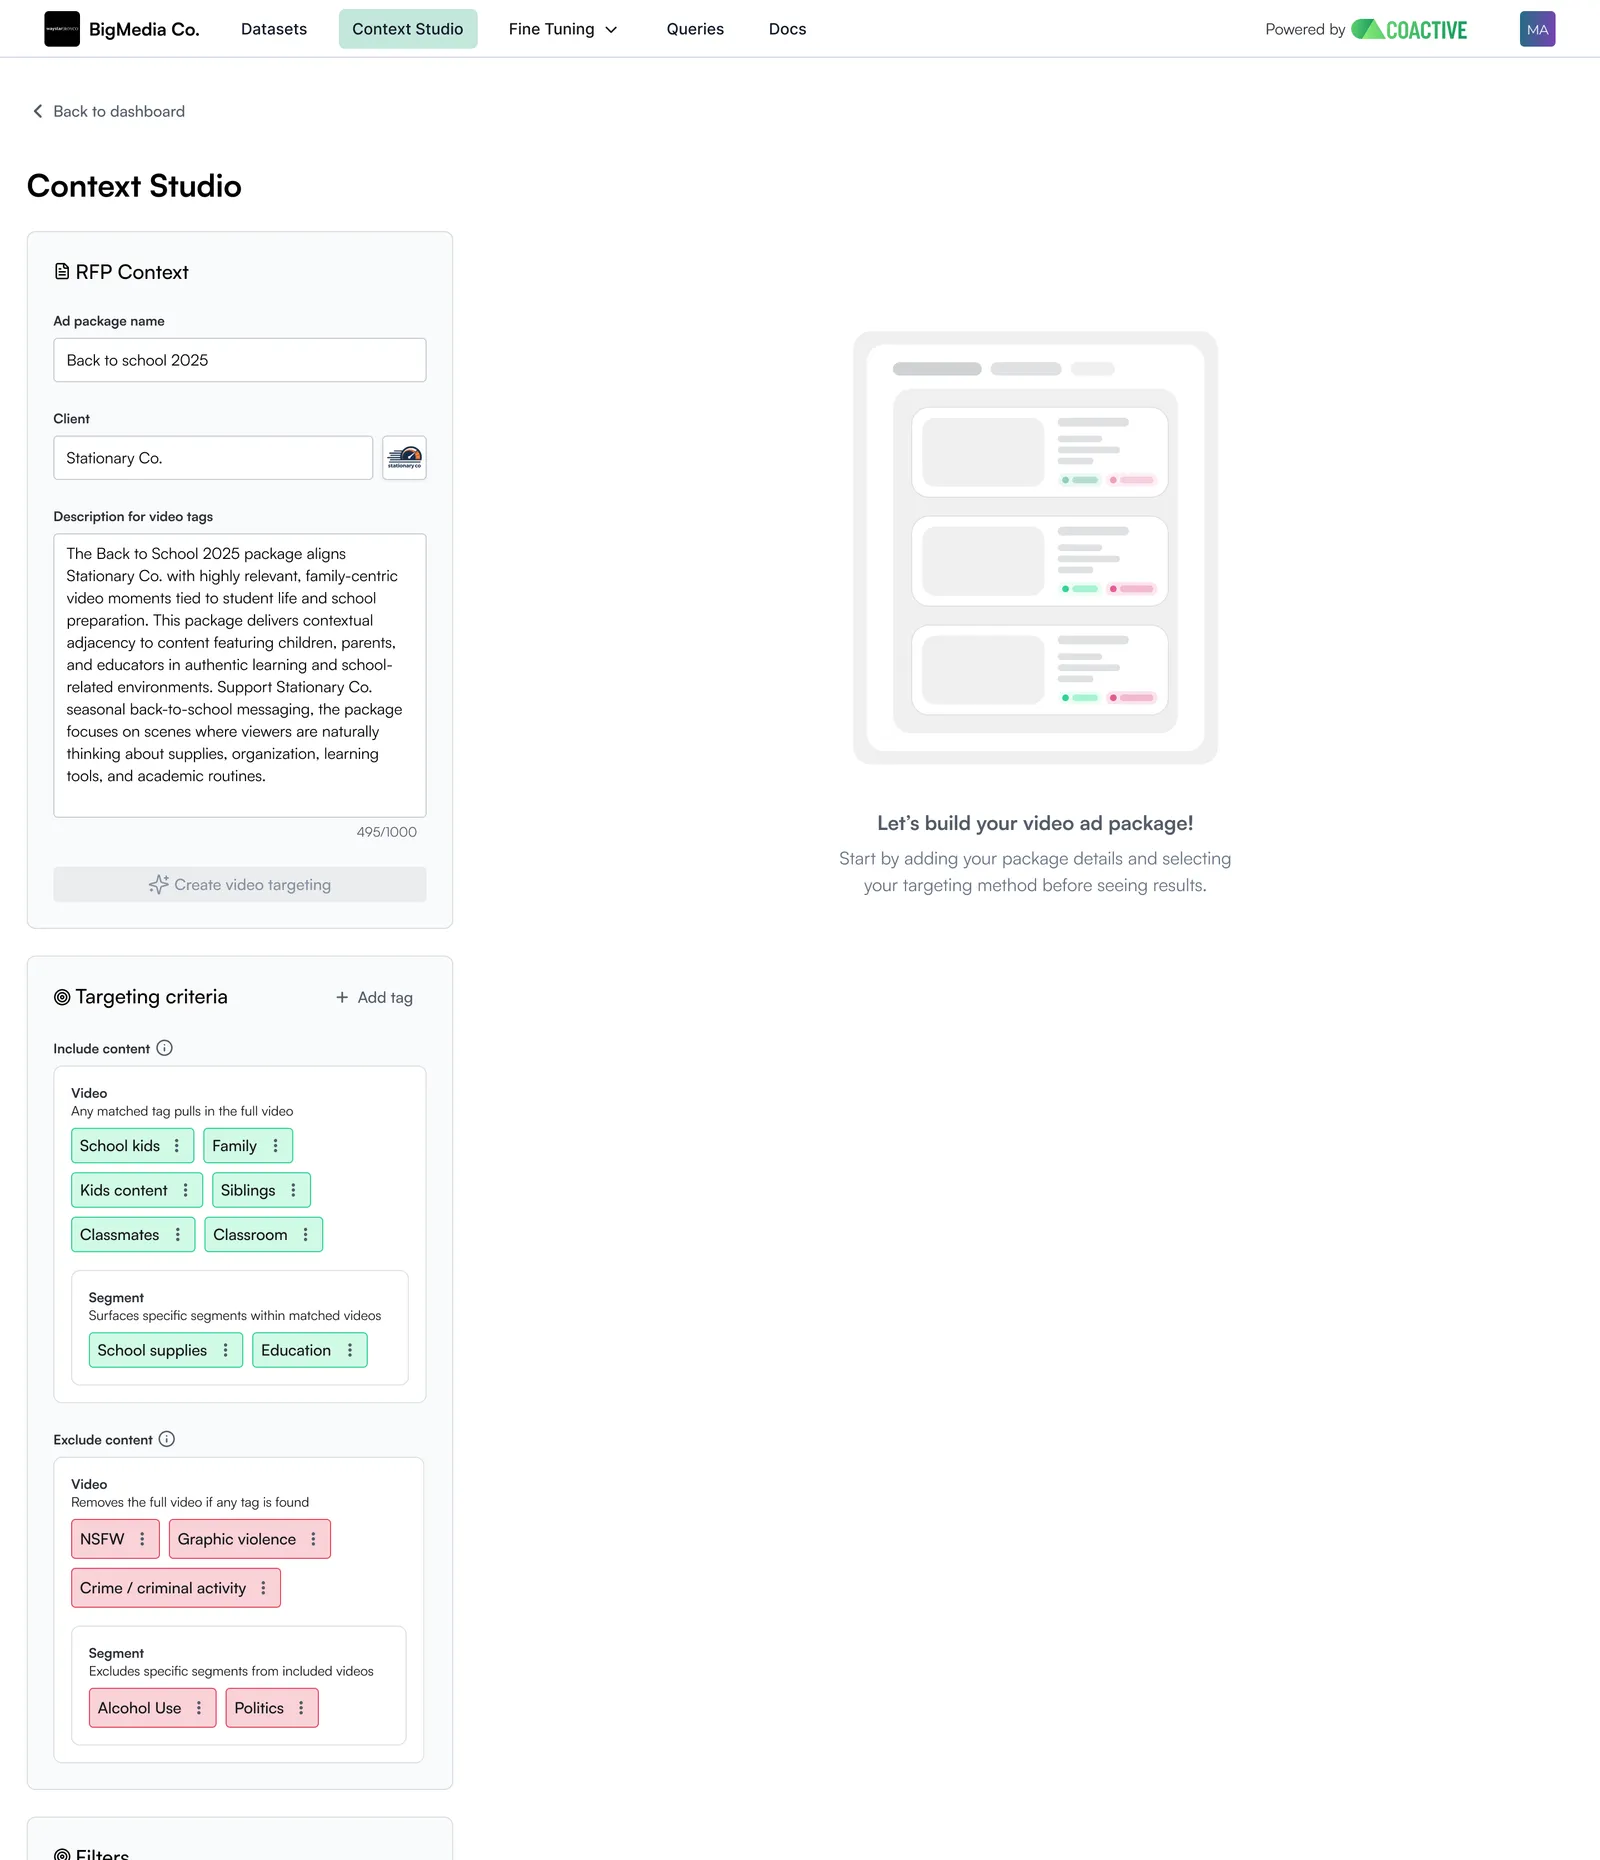
- Fill in the package details in the left panel:
- Ad Package Name — a descriptive name for internal use and export (e.g., “Gatorade Victory Moments Q3”)
- Client — the advertiser or brand this package is for. Optional: add a logo.
- Description — a plain-language summary of the campaign intent (e.g., “High-energy championship moments across sports content”). This is used to automatically suggest matching tags in the next step, but it’s optional if you prefer to add tags manually.
Step 3: Add Targeting Tags
There are two ways to build your targeting criteria, feel free to use one or both:
Option A: AI Tag Suggestion (recommended)
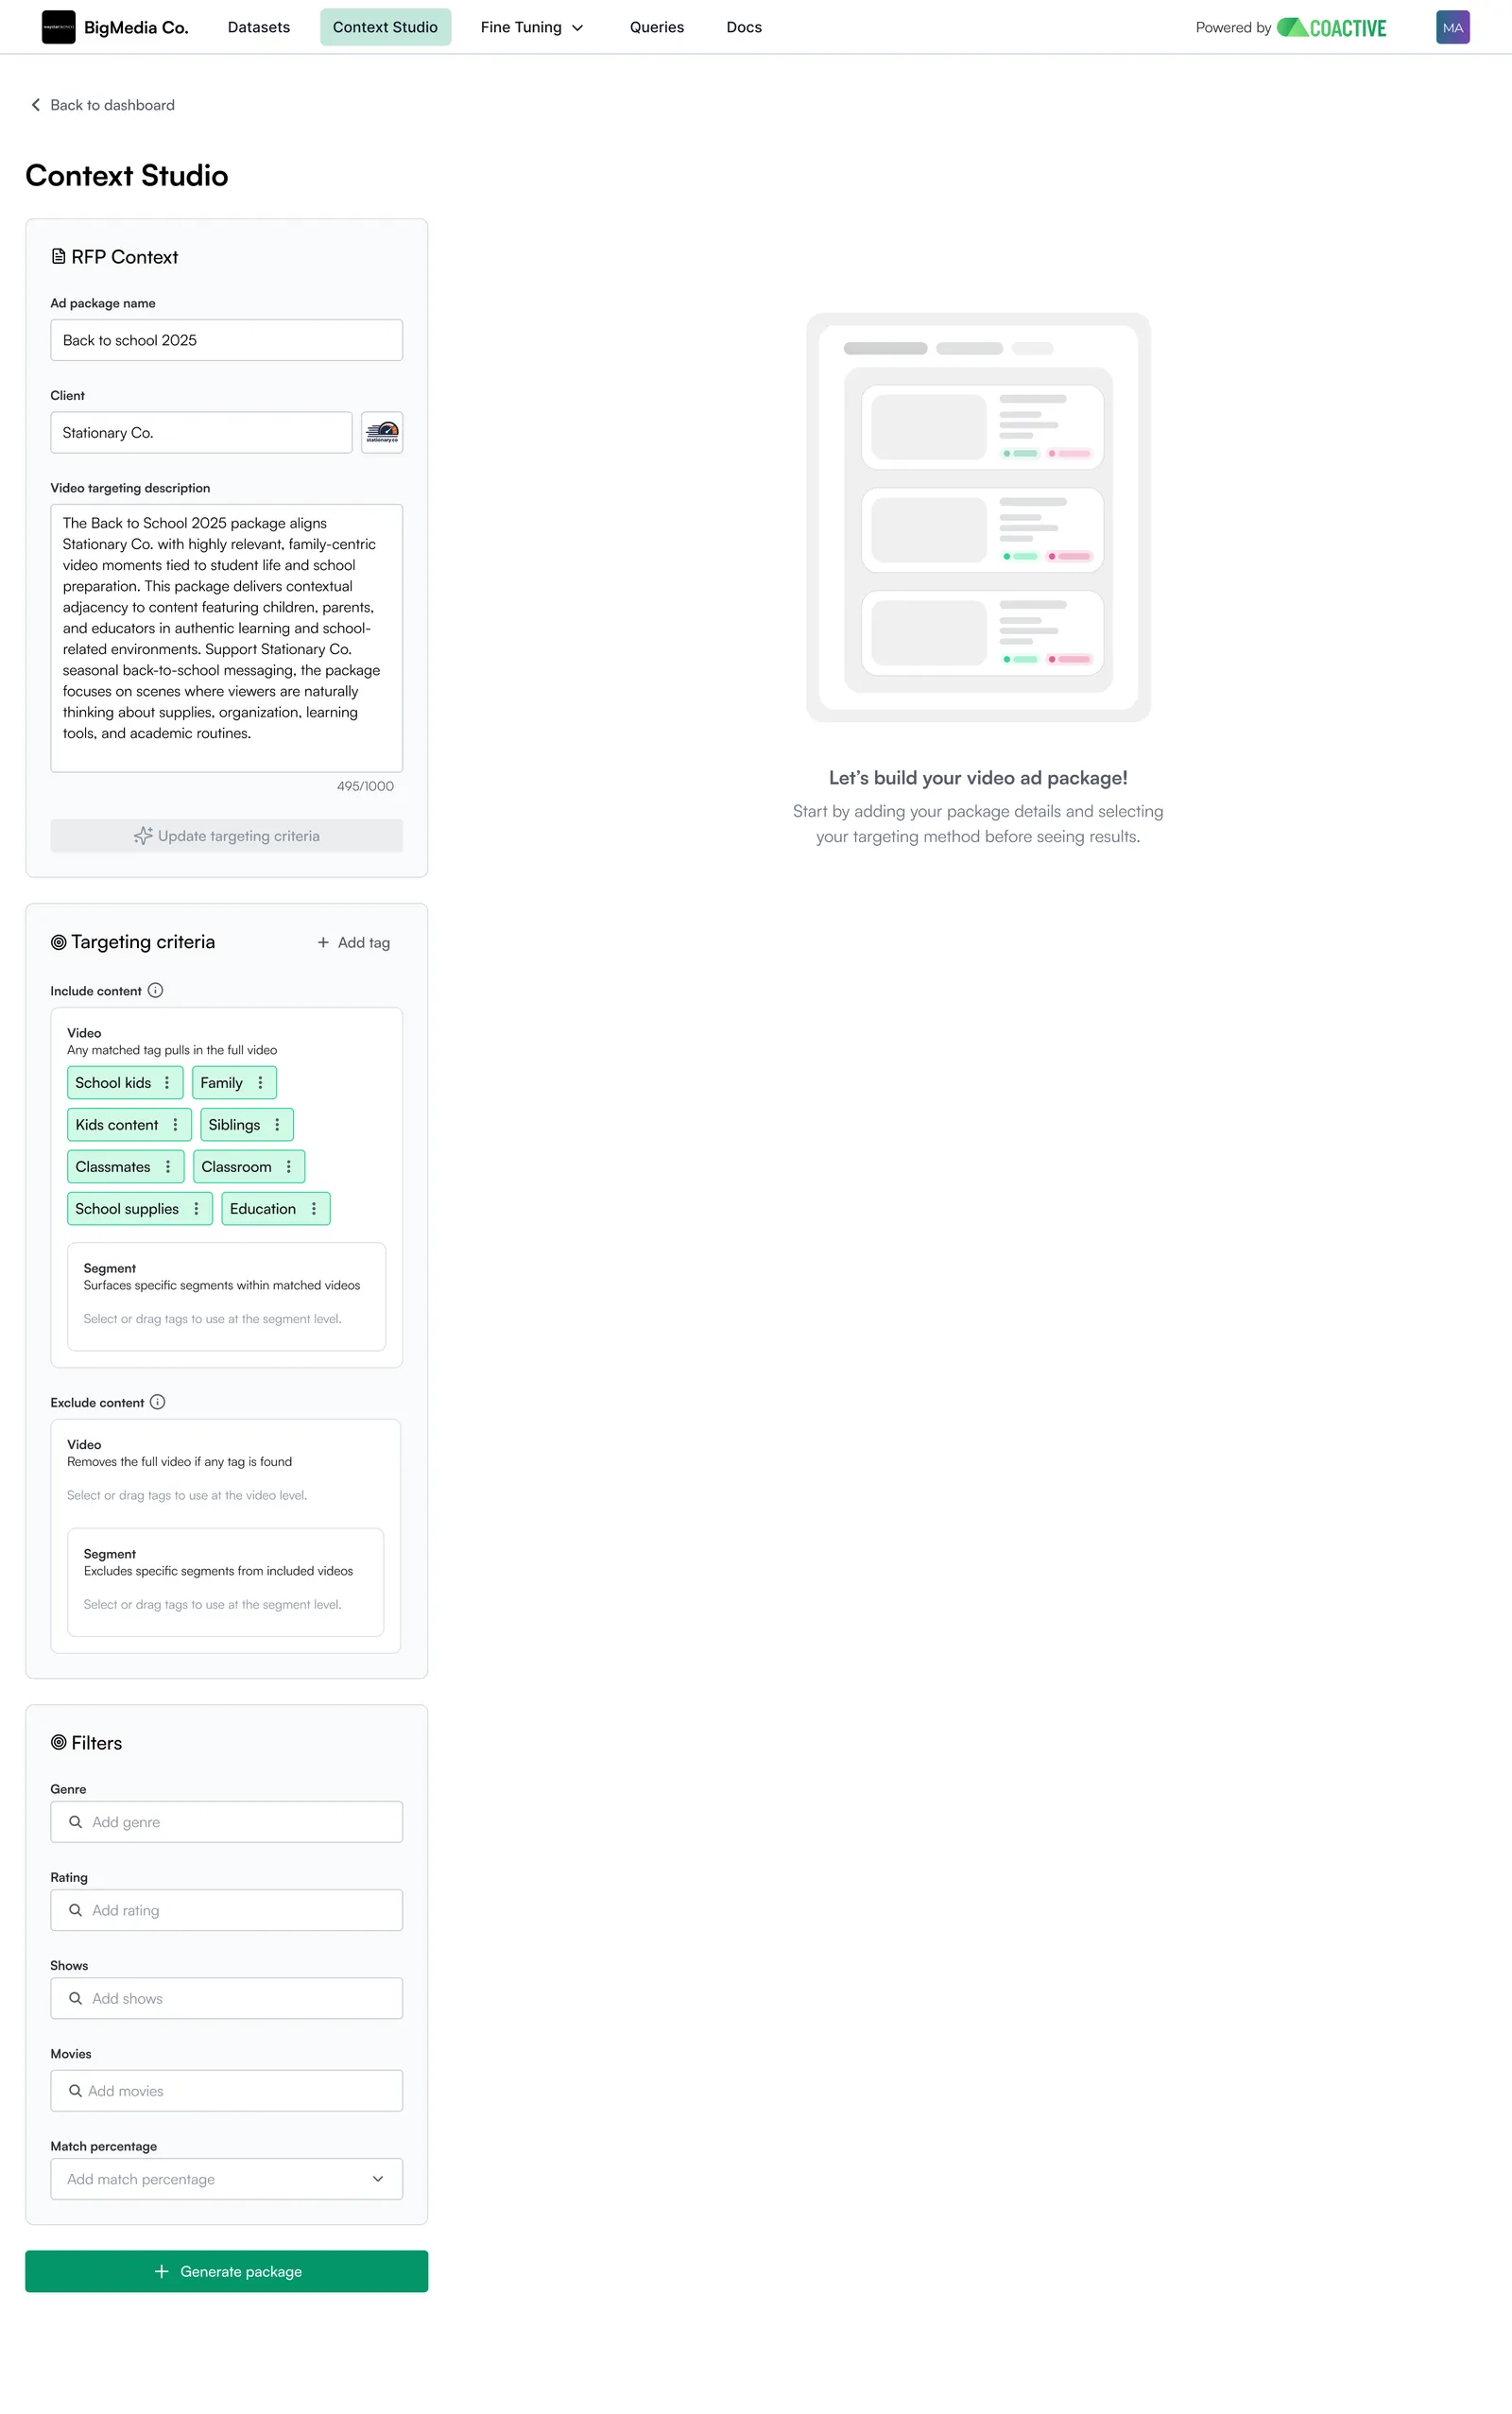
After entering a description, click Generate targeting criteria. Context Studio will match your plain-language description against your validated tag library and recommend inclusion and exclusion tags automatically. Review the suggestions, accept what fits, and remove anything that doesn’t.
The more specific your description, the better the suggestions.
Example description: Promoting a premium sports drink brand targeting competitive athletes and fitness-focused viewers. Content should feature athletic training, championship moments, and scenes of physical achievement and celebration. Ideal visual settings include gyms, stadiums, outdoor sports fields, and team competitions.
Option B: Add Tags Manually
If you already know which tags you want — or prefer to skip the description — click Add Tag in the Targeting Criteria section to select from your validated tag library directly.
Tags added here (via either method) are applied at the video level, meaning the entire video episode is evaluated against the tag criteria. To target at the scene level instead (evaluating individual ad slots between ad breaks), see the Scene Segmentation Guide.
Step 4: Review and Configure Inclusion Tags
After generating or manually adding tags, review what’s been added under Include content → Video. Tags at the Video level apply to the full episode which is any video where a matched tag fires will be pulled into the package.
To remove a tag that isn’t a good fit, click the three vertical buttons on the tag chip and remove it. To add additional tags, click + Add tag.
Configuring Aggregation Settings
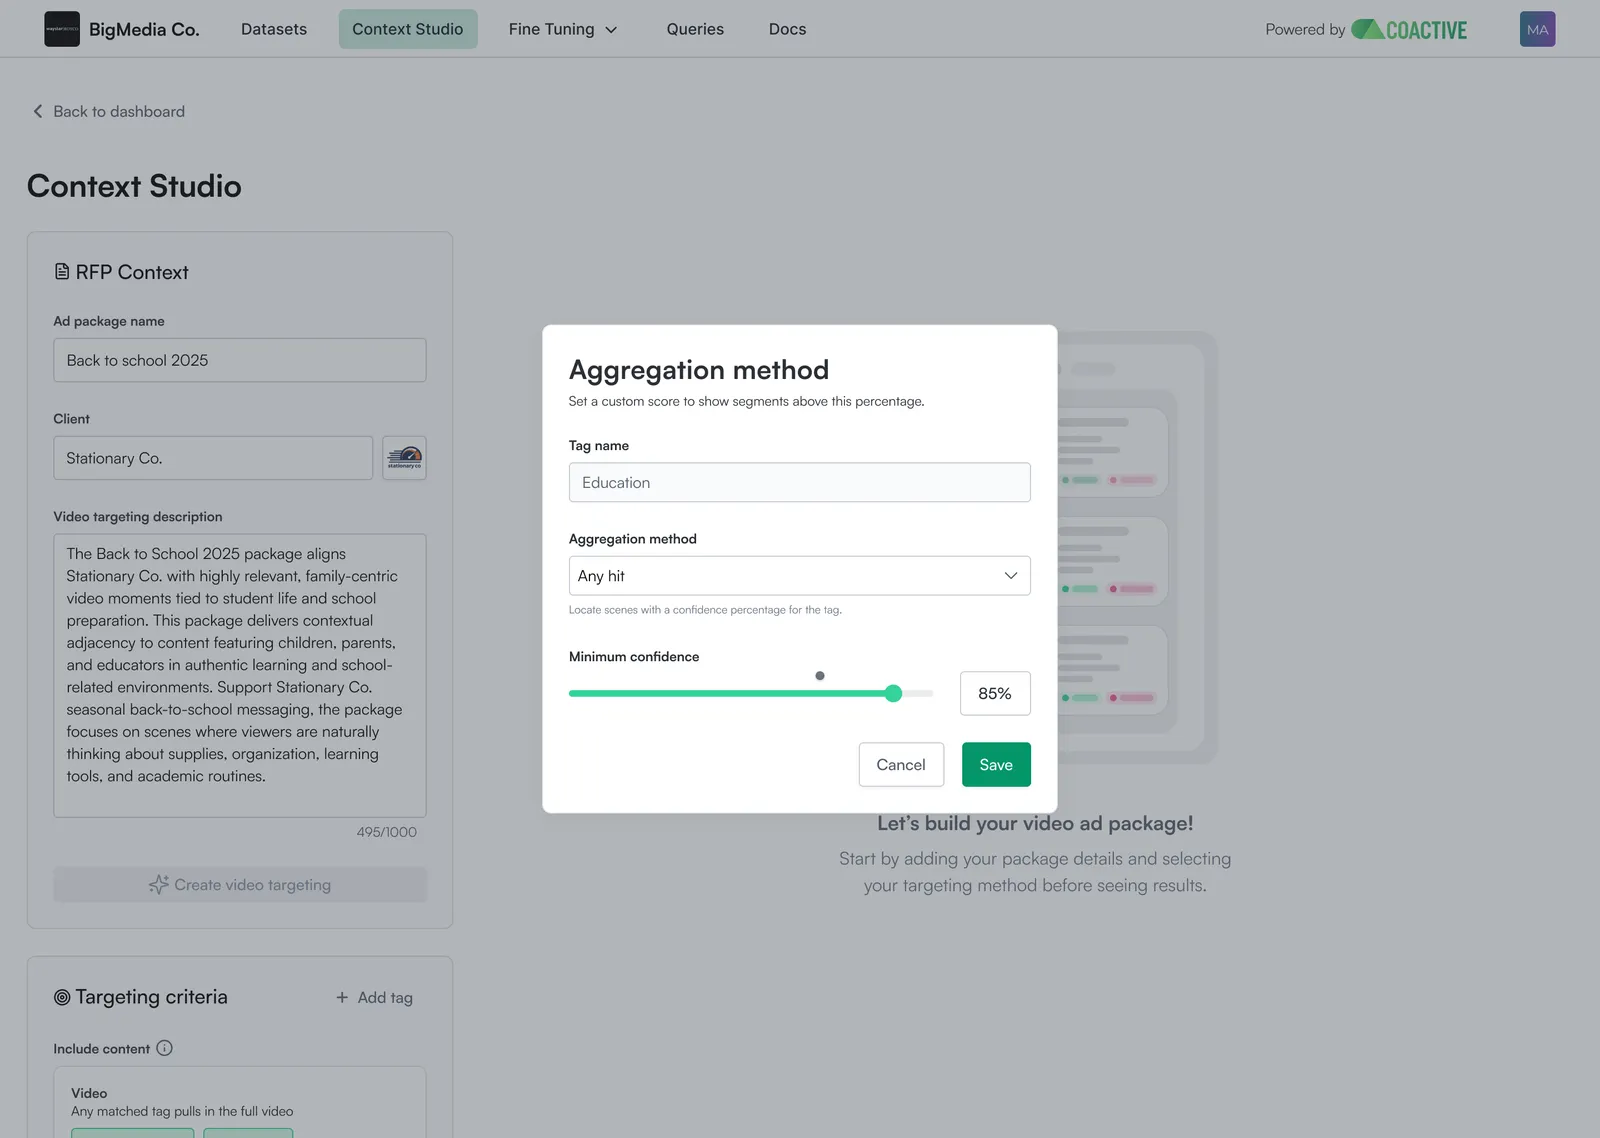
Click on any inclusion tag to configure how it’s evaluated at the video level:
-
Aggregation Method: choose how shot-level scores are combined to determine whether a video passes for this tag:
- Any Hit: Passes if any single shot meets the confidence threshold (best for brief appearances)
- Coverage Threshold: Passes if matching shots cover at least 30% of the total duration (best for thematic content — e.g., predominantly about cooking)
- Longest Run: Passes if there’s a continuous sequence of matching shots lasting at least N seconds (best for sustained moments — e.g., 30+ seconds of action)
-
Minimum Confidence Score: use the slider to set how confident the AI must be before a shot counts (higher = more precise, lower = broader reach)
-
Save to confirm the settings
Step 5: Add Exclusion Tags
Exclusion tags disqualify content that would otherwise match. If a video or scene triggers any exclusion tag, it’s removed from the package — regardless of how many inclusion tags it satisfied.
- In the Exclude section of the targeting panel, click Add Tag
- Search for or select the tags that represent unsafe or off-brand content (e.g.,
brand_safety_violence,NSFW) - Configure aggregation settings the same way as inclusion tags — for brand safety, Any Hit is typically the right choice (one instance is enough to exclude)
Exclusion tags use “Any Hit” by default, which is usually appropriate for brand safety use cases. If you want to exclude only content that is substantially about a topic (not just briefly), switch to Coverage Threshold.
Step 6: Set Metadata Filters
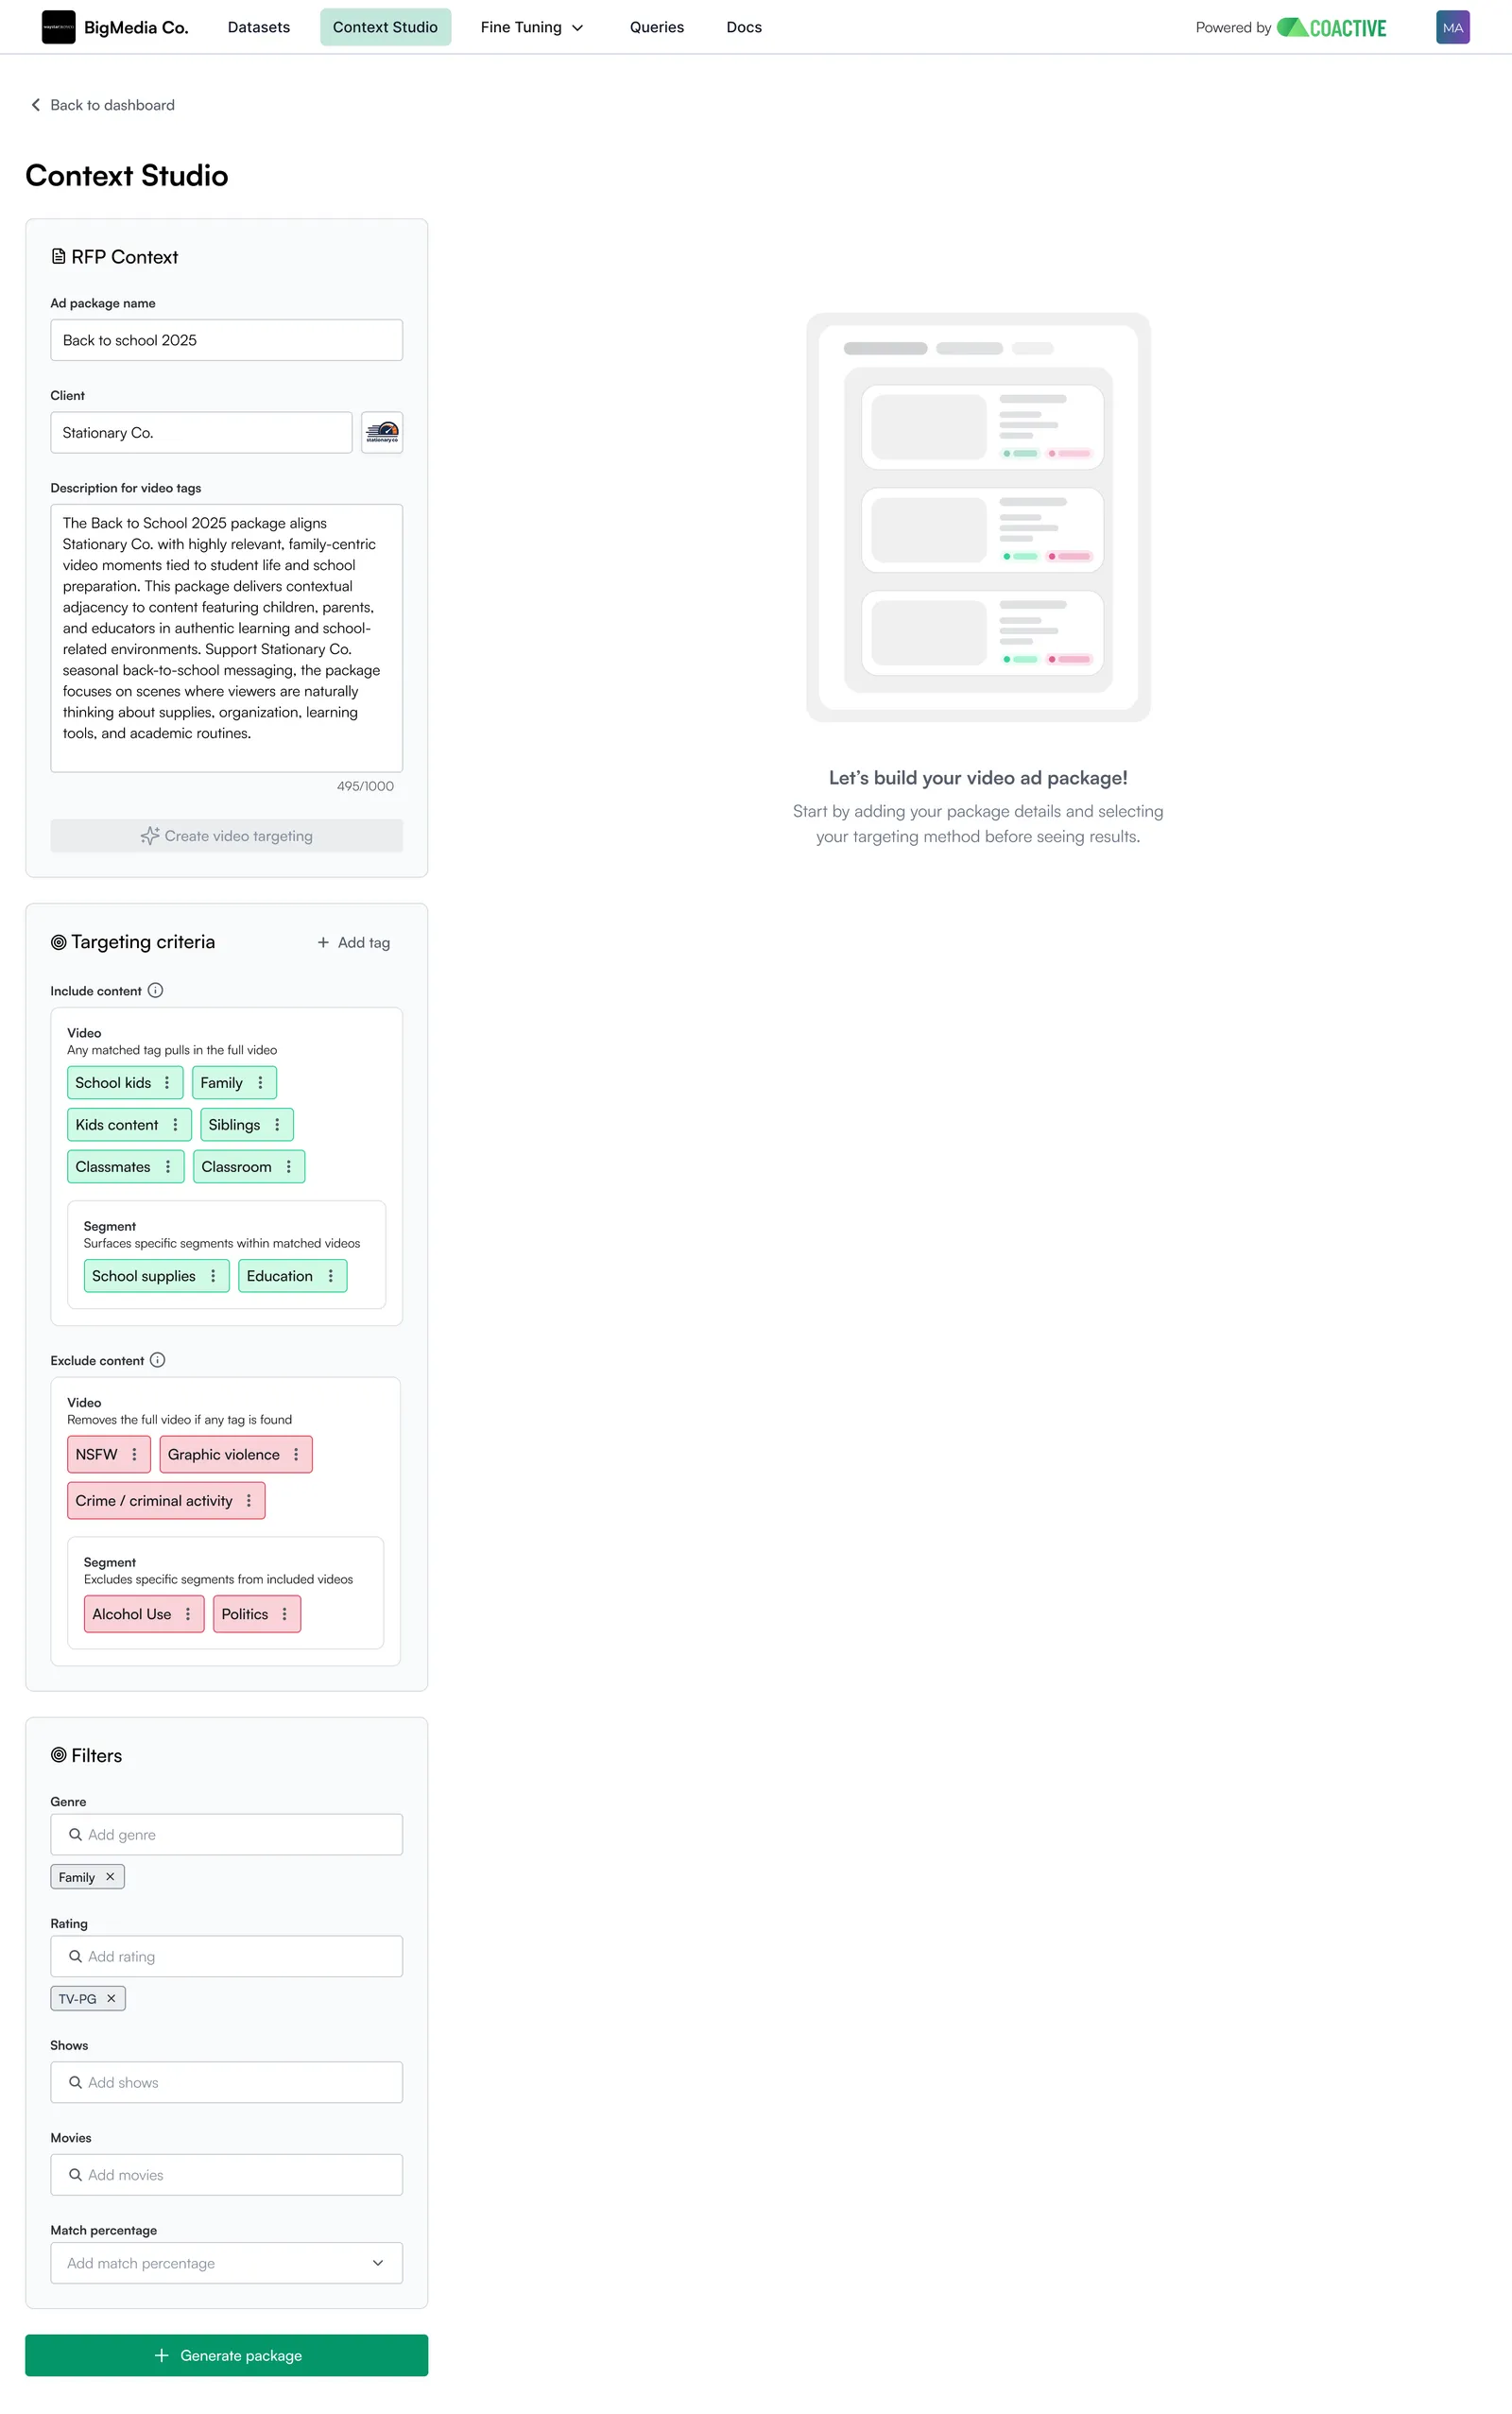
In addition to tag-based targeting, you can filter your package by video-level metadata. These filters are applied on top of your tag logic. A video must satisfy both the tag criteria and the metadata filters to be included.
Available metadata filters:
To add a metadata filter:
- In the targeting panel, scroll to Metadata Filters
- Click Add Filter
- Select the filter type and enter the value(s)
- Repeat as needed
Step 7: Set the Match Percentage Threshold
The Match Percentage threshold controls how many of your inclusion tags a video must satisfy to be included in the package.
- Show all matches (default): The video must match every inclusion tag
- 60%: The video qualifies if it matches at least 60% of inclusion tags
Step 8: Review Package Results
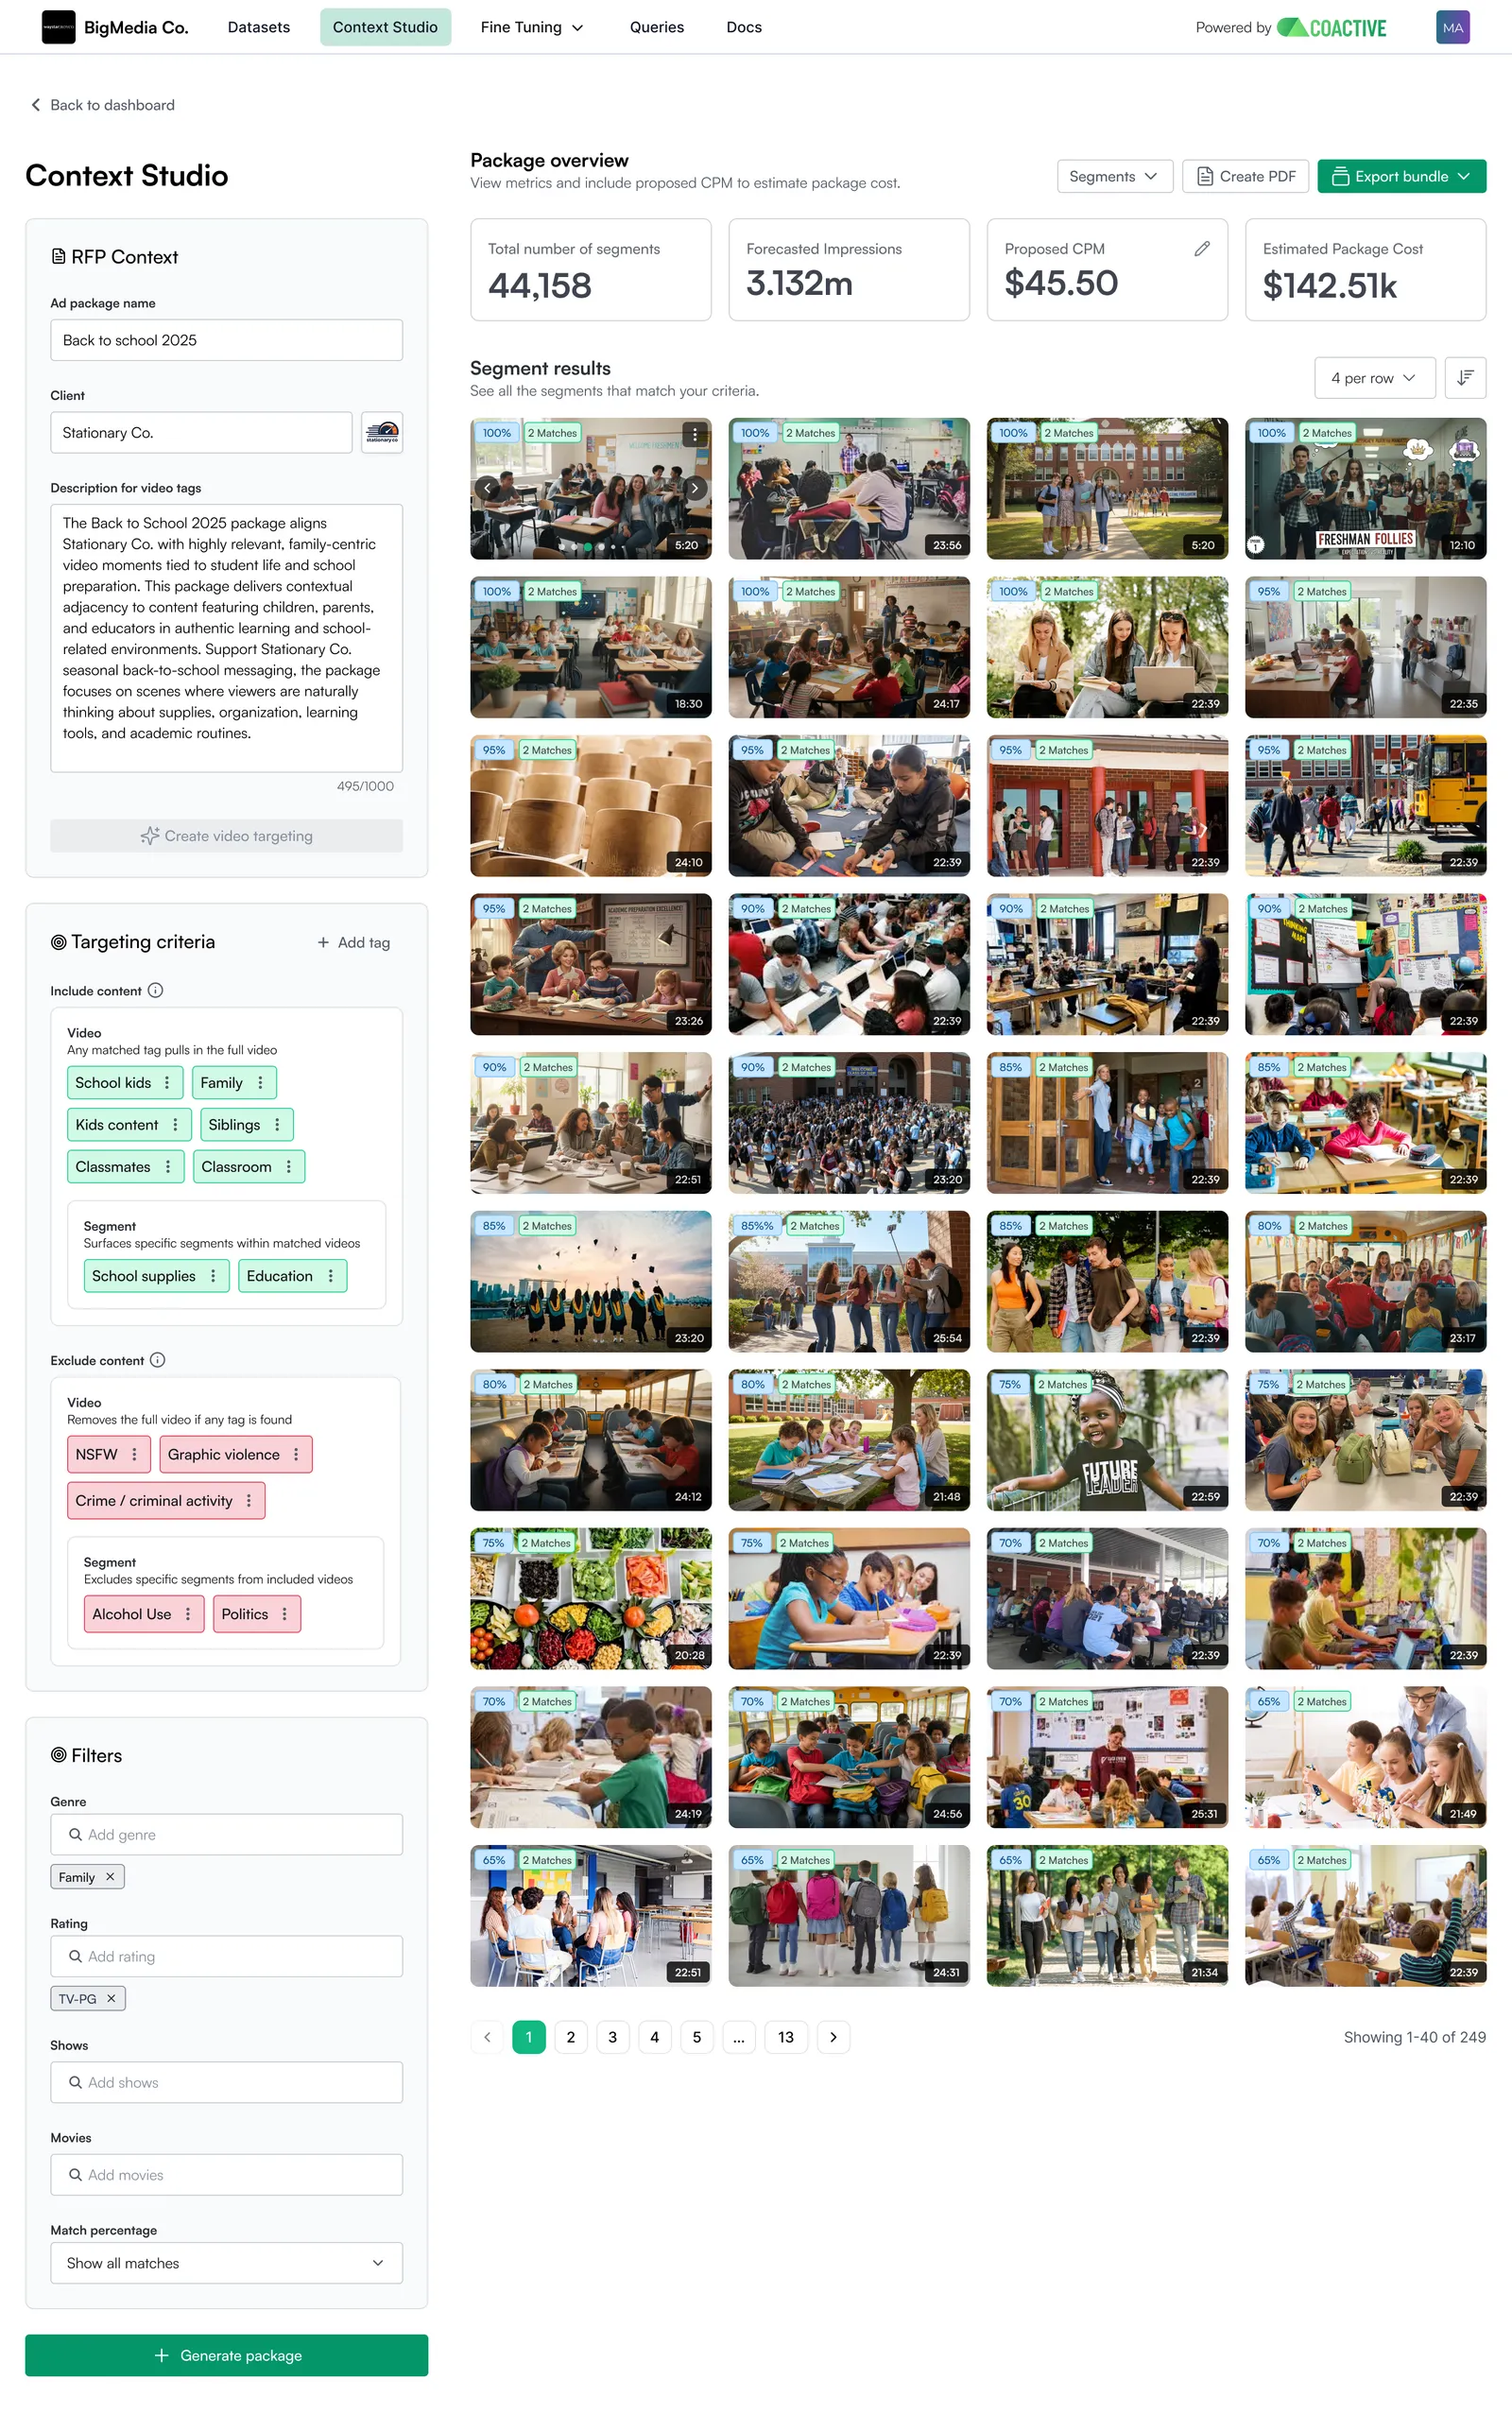
Once your targeting criteria are set, click Generate Package. The right panel updates to show the videos your package contains.
Package Overview Panel
Review these key metrics:
- Total Videos/Segments — how many content assets match your criteria
- Forecasted Impressions — estimated ad impressions based on matching content
- Proposed CPM — manually input your suggested cost
- Estimated Package Cost — total package value
Browsing Matching Content
Below the overview, you’ll see a list of matching videos or scenes. Each row shows:
- Thumbnail — a preview frame from the content
- Episode Name — the title of your video
- Match % — how many of your inclusion tags this content satisfied (e.g., 4/5 tags = 80%)
- Tag badges — which specific tags fired
Hover over any matching card to open a tooltip with more detail, including the content’s season and episode number and the matching segment’s time range — for example, Season 3 Episode 1 • Segment: 00:00:00 - 00:02:32. Season and episode information appears only when that information is available for the content; otherwise the tooltip shows just the segment’s time range.
Click any row to open the Timeline View for that piece of content.
Step 9: Explore the Timeline View
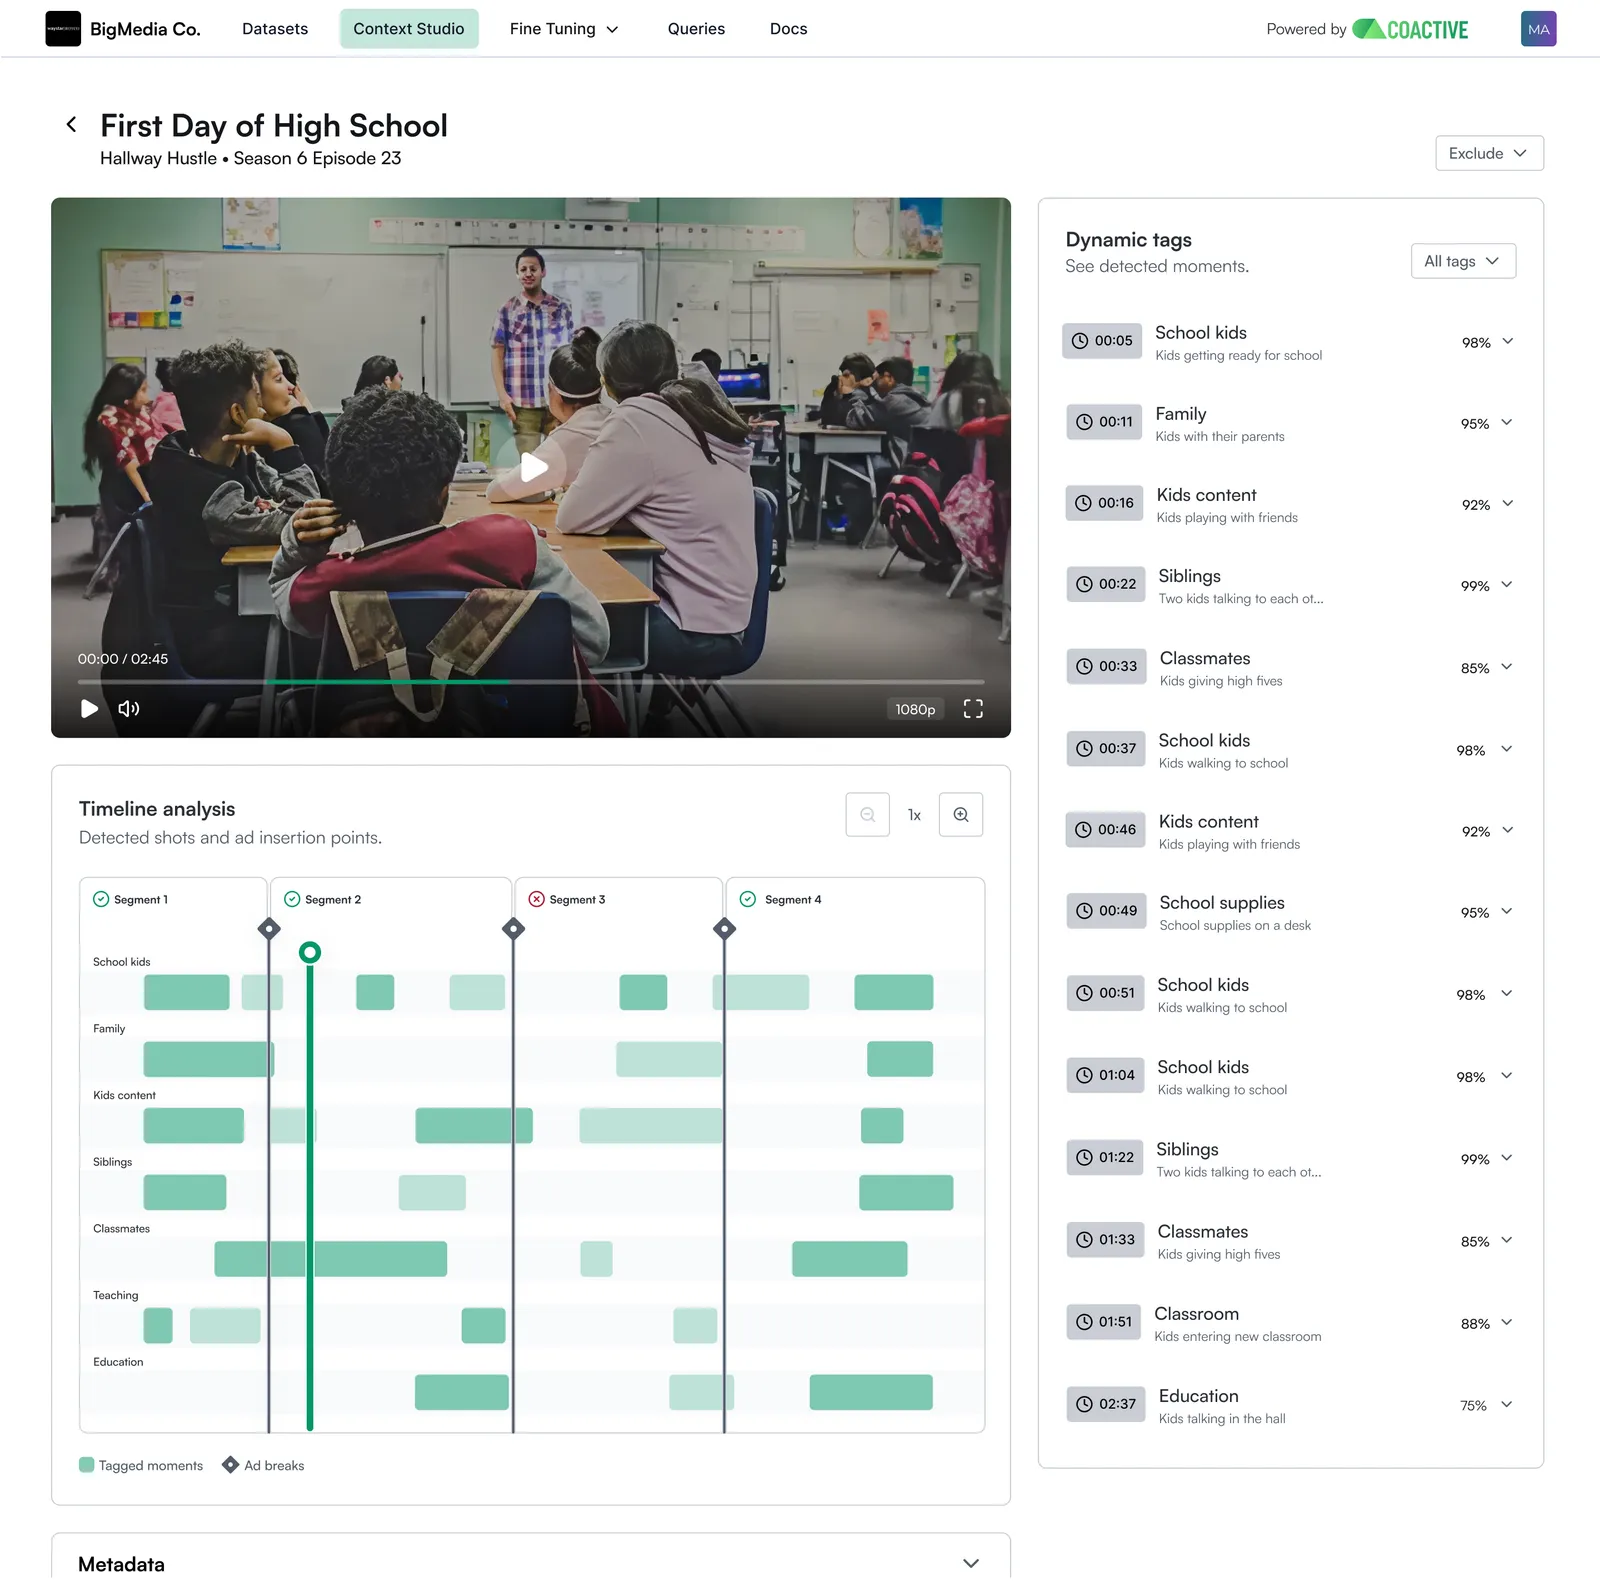
Click into a video to see the timeline view. This gives you a visual breakdown of exactly where your targeted moments appear within a specific video.
- Green bars on the timeline represent moments where a given tag is active at your configured confidence threshold
- The timeline on the right hand side is labeled with tag names so you can see which moments are driving the inclusion
- Use this view to validate that the content is truly a good fit before exporting
If gray vertical lines appear on the timeline, those are ad break cue points provided by the publisher. When Scene Segmentation is enabled, the content between those lines is evaluated as independent scenes. See the Scene Segmentation Guide for more.
Video details and metadata
When you open a video, the header shows the program details next to the video title — the series or episode name, plus the season and episode number when they’re available.
Under the timeline, a Metadata panel shows content-level details for the video. These fields appear only when the underlying content has them populated:
- Content ID — the identifier for the piece of content, which you can copy directly from the panel
- Impressions — the impressions associated with the content
- Genre — the content’s genre classification (e.g., Action, Comedy, Reality)
- Rating — the content rating (e.g., TV-G, TV-14, TV-MA)
The panel also shows the Source URL, the Coactive video ID, the total number of shots in the video, and its duration.
Step 10: Generate a PDF Summary
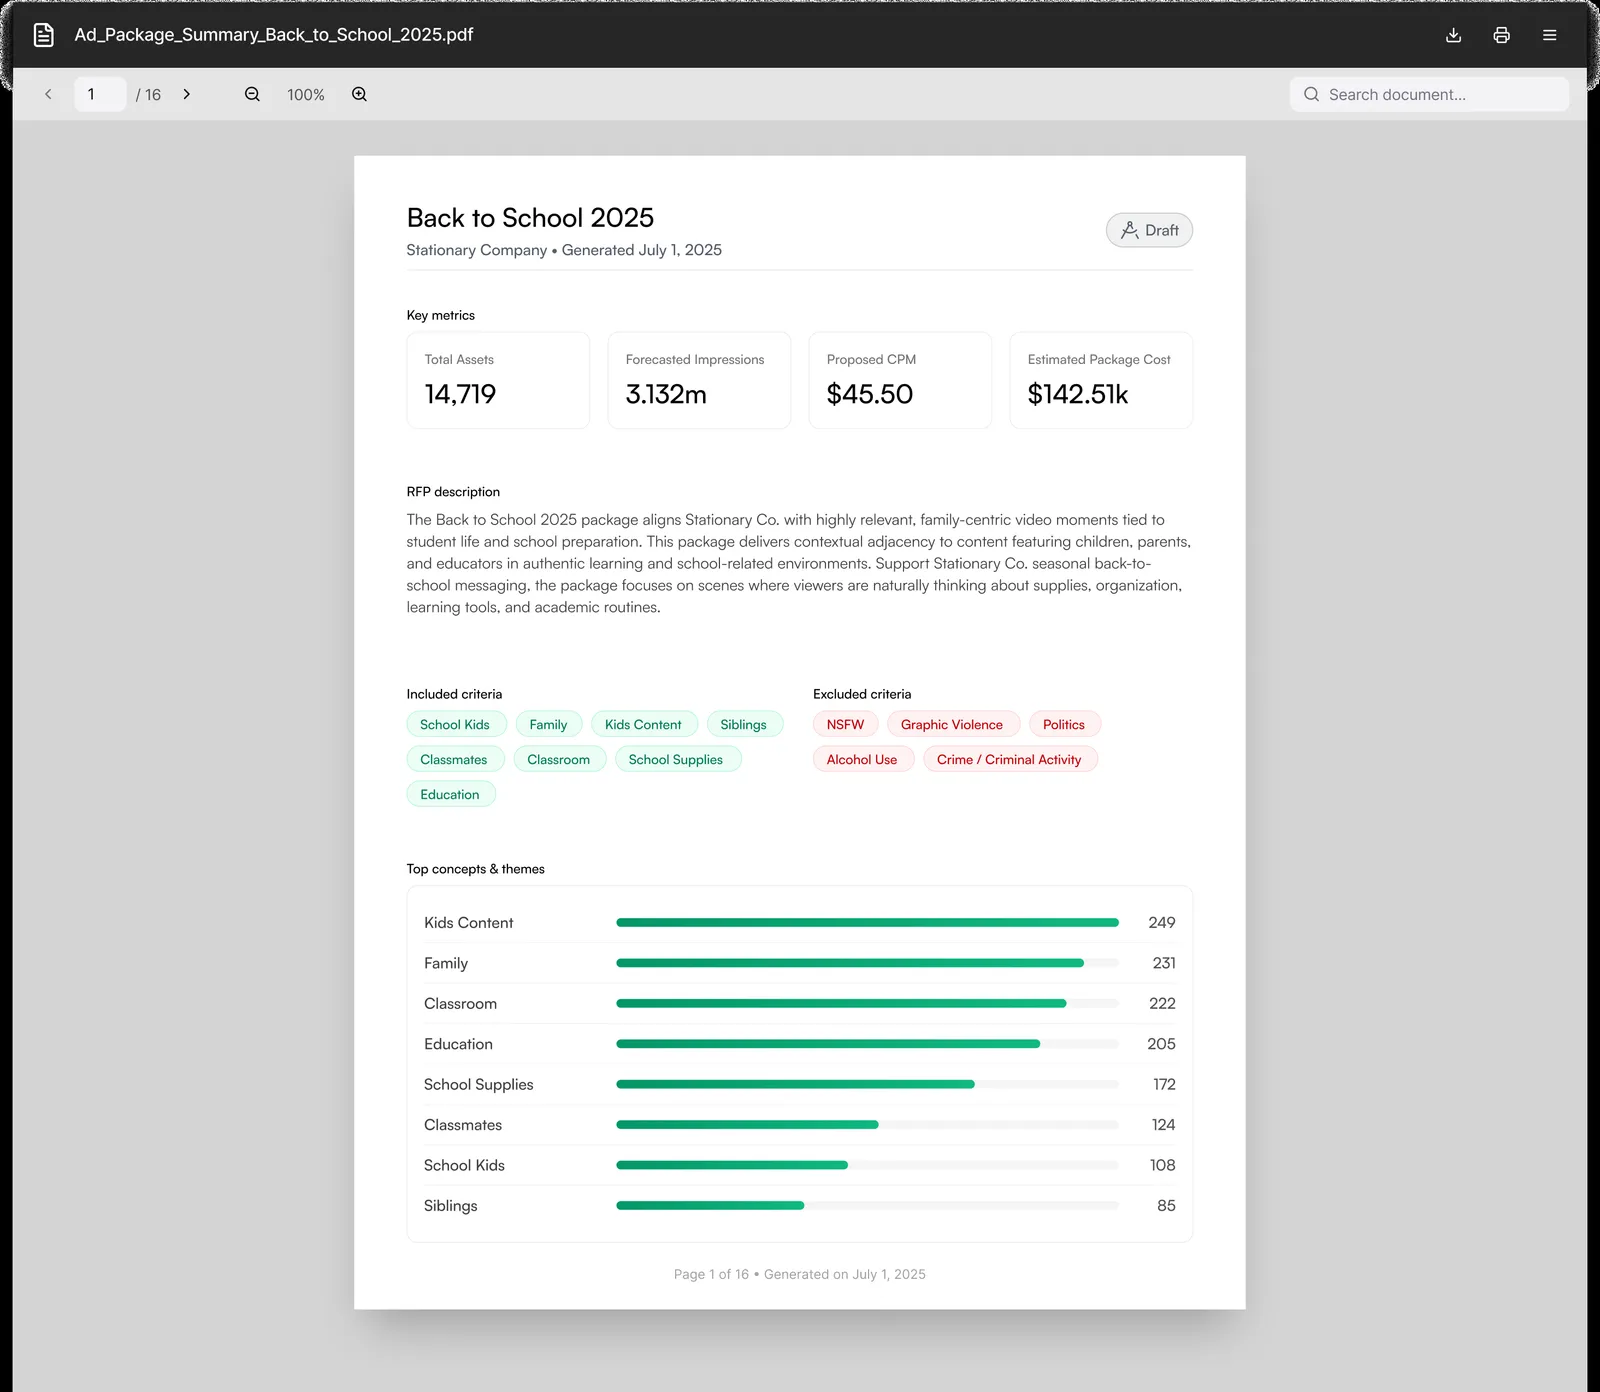
Before sharing with an advertiser or account team, you can generate a PDF summary of the package.
- From the Package Overview, click Create PDF
- The PDF includes:
- Package name, client, and description
- Targeting criteria (inclusion and exclusion tags with settings)
- Package metrics (impressions, CPM, estimated cost)
- Sample matching content
Step 11: Export the Bundle
When you’re ready to activate the package, click Export bundle.
Exporting a package locks it, preventing any further changes. This ensures your ad server receives it exactly as you intended. Review your targeting criteria and results carefully before exporting.
The export flow walks you through setting up the bundle as either a Recurring or Fixed package. See the Recurring Packages guide for guidance on choosing between them.
Once you’ve made your selections — including an optional end date for recurring packages — click Export to confirm, and your JSON file will be saved directly to your S3 bucket.